This page covers the preference settings. For why the audio settings decide whether a measurement is trustworthy - bit-exact, exclusive capture and playback - see Theory of operation ▸ Audio backend.
Opened from Tools ▸ Preferences. Live capture and generator playback are paused while the dialog is open, so device or format changes don't tear a running stream; OK applies and saves, Cancel reverts. The window resizes: it opens at its minimum size, and widening it widens the entry fields in place rather than leaving white space. The dialog is organised into five tabs, in this order: Audio, Look & Feel, Oscilloscope, FFT and Frequency response. Audio is the first tab and the one the dialog opens on - it is where a measurement session starts.
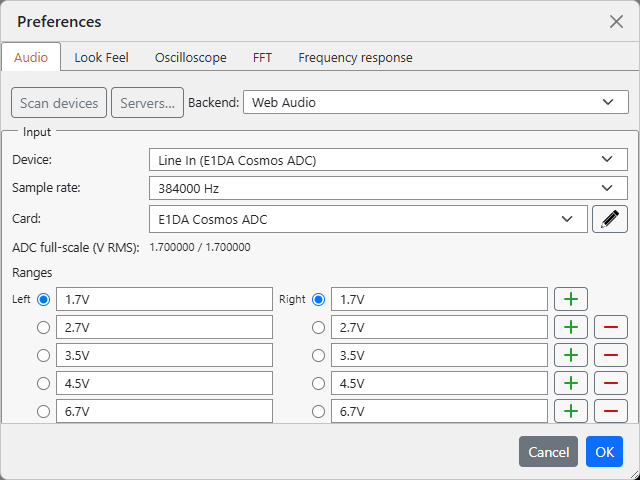
Selects the sound back end and the input / output devices and formats - the settings that decide whether a measurement is bit-exact (see Theory ▸ Audio backend).
| Setting | Notes |
|---|---|
| Backend | Web Audio (the default - the browser's own capture and
playback path, see
Phonalyser in a browser) or
QA40x - a QuantAsylum QA402 / QA403 analyzer driven directly
over WebUSB (see
Theory ▸ QA40x). The
QA40x row is listed even in a browser that cannot use it, disabled
and carrying its reason - Requires WebUSB over https:// or
localhost - works in Chrome; other Chromium browsers may not expose
it - because that is something you can act
on. Changing the selection re-enumerates the device lists. Once
you are connected to a Phonalyser
server the same list also carries that bench's backends, written
<server> -> <backend>; a backend the bench
reports as unavailable or not operational - CoreAudio on a machine
that is not a Mac, a QA40X with no analyzer plugged into it - is not
listed at all, because it is not a choice you have. |
| Input - Device / Sample rate | The capture (ADC) device and the rate it runs at. There is no bit-depth setting for Web Audio: the browser hands the page float32 samples downstream of the system mixer, so there is no depth to choose and none to report. The rate is likewise the one Windows has configured for that device rather than one this dialog picks - see Windows input device. A QA40x does have a depth, and shows the combo. |
| Output - Device / Sample rate | The playback (DAC) device and rate, used by the generator and the frequency-response sweep. Same rule: float32 out through the browser, with a bit depth offered only for the QA40x. |
https:// or
localhost, and a WinUSB-class driver on Windows - is in
Phonalyser in a browser ▸ the QA40x
and what WebUSB needs.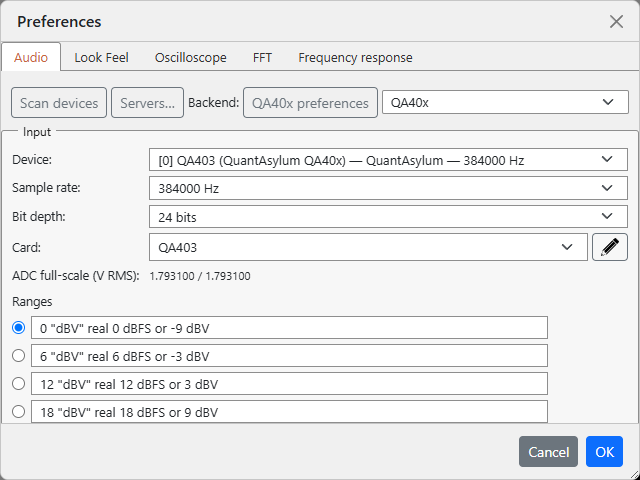
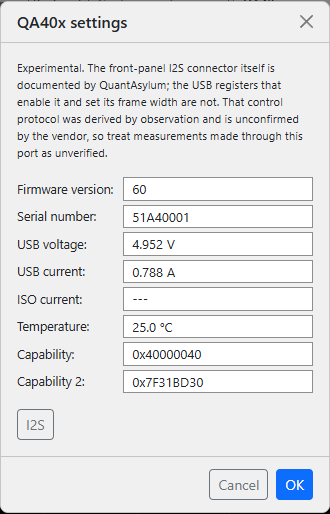
Three buttons share the row with the backend list. Two are always present; the third appears only for a backend that has settings of its own.
| Button | What it does |
|---|---|
| Scan devices | Reads the selected backend's device list again - the explicit
"I don't trust this list" gesture. For Web Audio it re-runs the
browser's own enumerateDevices, so a card plugged in
or pulled out since the page loaded appears (or disappears)
without reloading the page. It also re-composes the backend
list itself, which is how an analyzer connected since start-up shows
up as a backend at all, and it asks a
connected server for its backends
again. For the QA40x this click is the point: WebUSB opens
its device chooser only from a real user gesture, so the automatic
enumeration at page load can list only analyzers you have already
granted - pressing Scan is what raises the chooser for a new one. A
scan never disturbs a measurement: for a remote bench the device
list is only read, never re-selected. |
| Servers... | Opens the server list - the Phonalyser servers on the network, and the ones you added by address. It is there whenever the installation carries the network module, and it does not depend on the selected backend: a bench has to be chosen before any of its backends can be. |
| <backend> preferences | The selected backend's own settings, and the button is named after that backend - QA40x preferences for a QA402 / QA403, whether the analyzer is on this machine or on a bench across the network. It is hidden for a backend that has no settings of its own, which is every other one at present. |
Full-scale calibration - the volts RMS that map to the converter's ±1.0
digital full-scale, and therefore the absolute dBV axis, the scope's
voltage readouts and the generator's output level - belongs to the
physical card, not to the back end or to the device name a driver
happens to report. A card profile ties that calibration to the card
itself and follows it across back ends, because the same card shows up under
different names - the browser wraps it as Line (...) or
Speakers (...), a bench may report the bare name or an ALSA
[plughw:...] suffix. A profile keeps a single list of
recognized device names - the names and name-fragments that identify
this card - so one calibration serves it however the device is spelled.
match pattern by reading the Device combo, exactly as on the
desktop.A profile records, in one place: the card's name; which directions it is calibrated for (Provides: input, output or both); whether it has one channel or two (Channels: Mono or Stereo); how its two channels track each other per direction (Coupling: Linked or Independent); its list of switchable ranges (attenuator / gain / DIP positions); and the measured full-scale of each range - always stored per channel, since no two physical channels are calibrated exactly alike.
All card profiles live in one document in the browser's local storage,
under the key phonalyser.devices. It is seeded on first run with
ready profiles for a few well-known interfaces (the E1DA Cosmos ADC,
the JLsounds I2SoverUSB and the CUBILUX CB5) and everything you
edit in this tab is written back to it.
devices.yaml and no user data directory in
this build - that is the desktop application's arrangement.The ordinary way to read or edit it is Tools ▸ Devices ▸ Current, which opens the live document in a JSON editor that knows the shape below and will not let an edit through without checking it. Everything this section describes is what you see in that window.
The store can also be reached with the browser's developer tools, which is the
raw fallback - no completion, no checking, and a save takes effect only on the
next load: open them with F12, go to
Application ▸ Storage ▸ Local Storage, select this page's origin and
look at the phonalyser.devices row. Use it when you want to copy
the whole document somewhere, or to read a store the application will not
start on.
The value is JSON: two version markers and one object per card. An annotated store, with every key the application reads:
{
  "formatVersion": 1,        // schema marker - changes only if the schema itself changes
  "contentVersion": 2,       // catalogue generation - drives the once-per-release upgrade merge (below)
  "audioDevices": [          // the list of card profiles
    {
      "name": "E1DA Cosmos ADC",         // logical profile name shown in the Card combo (required)
      "match": [ "E1DA Cosmos ADC" ],    // recognized device names: substrings (case-insensitive) that identify this card
      "input": {                         // a per-direction block - "output" is the same shape
        "channels": "INDEPENDENT",       // MONO = one channel; LINKED = two channels, shared range switch; INDEPENDENT = two channels, each its own
        "ranges": [                      // one row per front-end position (attenuator / gain / DIP)
          { "label": "1.7V", "fsVrms": { "left": 1.7, "right": 1.7 }, "calibrated": true },   // measured full-scale per channel; calibrated = you measured this row (upgrades never overwrite it)
          { "label": "3.5V", "fsVrms": { "left": 3.5, "right": 3.5 } }                        // a range you have not yet calibrated - still the seeded nominal
        ],
        "activeRange": { "left": "1.7V", "right": "3.5V" }   // INDEPENDENT: a { left, right } map, each channel's own active row
      }
    },
    {
      "name": "I2SoverUSB",
      "match": [ "I2SoverUSB", "JLsounds" ],
      "output": {
        "channels": "LINKED",
        "ranges": [ { "label": "default", "fsVrms": { "left": 2, "right": 2 } } ],
        "activeRange": "default"         // LINKED / MONO: a single label (both channels switch together)
      }
    }
  ],
  "bindings": {                          // device -> card choices you made in the dialog; omitted entirely while nothing is bound
    "Line (E1DA Cosmos ADC)": "E1DA Cosmos ADC"   // this exact device name always resolves to this card, whatever "match" would say
  }
}
The // comments above are explanation, not part of
the document - JSON has no comments, so a value you paste back must not
contain them.
What the keys mean:
match is the Recognized device names list from the card
editor: each entry is matched as a substring (case-insensitive) against the
device name the driver reports, and when several cards could match, the
most specific (longest matching) entry wins. This is the
guess, used when you have not said which card a device is.bindings is the map of choices you did make: picking a
card in the Card combo records the selected device's name against that
card here. A binding is consulted before the match rule,
so a card that merely recognises part of a device's name can no longer
overrule the one you picked - which is what used to happen with two
interfaces whose names share a word. A binding naming a card that has since
been deleted or renamed is not an error: it falls through to ordinary
matching, so a stale entry can never leave a device uncalibrated. The block
is left out of the file entirely while nothing is bound. The same OK also
appends the device's exact name to that card's match list as a
visible alias, so you will see the name in both places - the
bindings entry is the one that decides.fsVrms is the range's full-scale in volts RMS. The application
always writes the { left, right } pair - each channel carries
its own measured value - though a single number applies to both sides if you
type one by hand."calibrated": true marks a row you actually measured through a
Calibrate flow; the upgrade merge never overwrites it. A row without the flag
is still the seeded nominal."calibrationFromDevice": true (add it inside the input
or output block) marks a card whose full-scale is reported by
the instrument itself (a QA40x-class device): its ranges stay switchable, but
the app never writes calibration into them and their full-scale values are
read from the device itself, not delivered by a catalog upgrade. Omit the
key for an ordinary card you calibrate yourself.activeRange is the selected row. INDEPENDENT uses a
{ left, right } map (each channel its own row); LINKED and
MONO use a single label.Editing it in the developer tools has one rule the built-in editor
does not: do it with the application's tab closed, then reopen the page.
The store is read once at start-up and rewritten whenever the app saves, so an
edit typed into storage while the app is running is simply overwritten. The
JSON editor has no such problem - it hands the
document to the running application itself, which is why its changes take
effect at once. Entries with no
name (or ranges with no label) and unrecognised keys
are skipped with a warning in the console rather than aborting the load, so a
small mistake costs one entry, not the whole store. Deleting the
phonalyser.devices key makes the next load re-seed the built-in
defaults, which loses any cards you added or calibrated.
A stored document that exists but cannot be parsed at all
is never silently replaced by defaults. In the browser these are entries in
the page's local storage, not files on disk, so the quarantine is a
copy under a new key rather than a file beside another: the unreadable value is
copied to <key>.corrupt and the failure is logged, so what
survives in it can still be recovered - read it out with the browser's
developer tools - and the next save cannot overwrite the evidence. This
covers the settings document and the device store alike. Local storage is
per browser and per origin: clearing site data for this page discards both,
and they do not follow you to another browser or another machine.
Upgrades never lose your work. The seeded catalogue carries a
contentVersion; when a new release ships a higher number the merge
runs once, then records the new number so it never repeats. For each
catalogue card it finds your matching card - by name or by a shared
recognized-name entry, so a card you renamed is still found - and reconciles only
its range table: a range the release added appears in your store, and a
range you both have is refreshed to the release's nominal full-scale -
except a range you calibrated, which keeps its measured value and its
calibrated flag. A card that is entirely new in the release is
added whole. Everything else is yours and is never touched: your calibrated
values, the cards and ranges you added by hand, your recognized-name list, your
channel modes and your active-range selections all survive.
Each direction - Input and Output - carries its own Card combo above its device controls. Bind a card profile when you want any of:
A plain sound card with a fixed front-end needs no profile - leave its Card selection empty and it behaves exactly as before this feature existed, drawing on the single shared full-scale that predates card profiles.
The combo lists every card profile that has at least one range in this
direction - the pre-seeded known cards included - plus New card...;
a device with no card shows an empty selection. A small pencil
(edit) button beside the combo opens the
card editor for the selected card.
The combo re-resolves automatically whenever the device changes: the app
matches the new device name against every card's recognized-name list and, when
one correlates, selects it and shows its ranges. When more than one could
match, the most specific (longest matching) recognized name wins. Selecting the
combo entry and pressing OK is what binds the device, and it does
two things at once: it records the device->card choice in the store's
bindings map - which is what
resolves the device from then on, ahead of any name matching - and it appends the
device's exact name to that card's recognized-name list as a visible alias. A
device is never bound to two cards at once, and it is the bindings
map that guarantees it: there is exactly one entry per device, so re-binding to
another card replaces that entry. The alias left behind in the previous
card's list is not removed - but it no longer decides anything, and the device
follows the new card.
When no card matches the device, the app does not bind one silently: it
offers to make one - Create a new card for '<device>'? - and on
yes opens the card editor pre-filled from the device name. You can also pick
New card... yourself, or leave the selection empty to keep the device
unbound.
Leaving the selection empty keeps the device unbound: it falls back to the
single shared full-scale that predates card profiles, and the range table stays
hidden. That global calibration survives only for the current session and is
never written back to the settings document - a document from before 1.2
is still read once, and the entries disappear with the first save. The cards in
the device store are the persistent home
of every full-scale value, so
bind every measurement device to a card.
Selecting New card... creates a profile whose first range is
seeded from the calibration currently in effect, so the new card starts already
calibrated to wherever you were.
The pencil button opens the card editor, a small dialog holding every property of a card except its per-range voltages (those come only from the Calibrate flows).
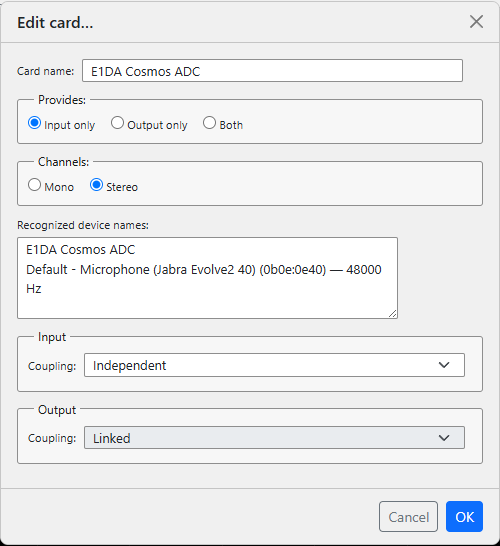
| Property | Notes |
|---|---|
| Card name | The logical name shown in the Card combo. Must be non-empty and unique. |
| Provides | Input only, Output only or Both - which directions this card is calibrated for. A card appears only in the combos for the directions it provides. Narrowing a card that already carries calibrated ranges in a dropped direction asks first, since those ranges would be deleted. |
| Channels | Mono (one physical channel - a single full-scale serves both sides) or Stereo (two channels). |
| Recognized device names | One device name - or a fragment of one - per line. This card is chosen
whenever any line appears (as a substring, case-insensitive) in the
device name the driver reports; when several cards could match, the most
specific line wins. The list holds the card's recognition patterns plus
the visible aliases appended when you bind a device to it. The binding
itself does not live here: it is an entry in the store's
bindings map, and it
wins over any matching this list produces. |
| Input / Output - Coupling | Per direction, how a Stereo card's two channels track each other. Linked switches both channels' ranges together, but each channel still keeps its own calibrated full-scale value - coupling shares only which range is selected, never the measured volts. Independent lets each channel select its own active range. A Mono card ignores this. |
The Input and Output groups grey out to match Provides - an input-only card shows its Output group disabled, and vice-versa.
A range is one setting of the card's analog front-end - an attenuator step, an input-gain position, a DIP or relay setting - each with its own full-scale voltage. The table lists one row per range:
| Column | Notes |
|---|---|
| Active marker | Selects the one range whose full-scale is currently in force. Exactly one range is active at a time; switch it to match the front-end position you have set on the hardware. |
| Label | An editable name for the range - e.g. the attenuator or gain position
it stands for (0 dB, −20 dB, a DIP code). |
| Add / Remove | Add a range for another front-end position, or remove one. |
The row carries no full-scale voltage field. A range's full-scale value is not typed here - it is set exclusively by running the crosshair Calibrate flow with that range marked active, which writes the measured full-scale into it.
A plain card that never changes its front-end keeps a single row. A switchable interface gets one row per position, and you flip the active marker whenever you change the hardware.
How many active columns the table shows follows the card's Channels and per-direction Coupling, both set in the card editor:
For a QA402 / QA403 - on this machine or on a bench across the network - every input row carries a second label after the plain one:
0 "dBV" real 0 dBFS or -9 dBV
It is there because the analyzer's range names are not RMS voltages, and reading them as such is off by about 9 dB. A QA "N dBV" input range is an N dBFS reference measured peak-to-peak across the differential pair; the RMS full-scale voltage that corresponds to it sits roughly 9 dB lower - a factor of 2 for peak-to-peak versus peak, and √2 for peak versus RMS, is 2·√2 ≈ 9.03 dB. So the range the analyzer calls 0 dBV is a full scale of about −9 dBV RMS, and that is the number every volt, dBV and derived figure in this application is computed from.
Three things follow. The second label is display only: the stored
card keys, the range radios and the values written into the
device store keep the plain N dBV, so
nothing in your store changes because of it. The output ranges are
left alone - those are genuine dBV, with no hidden peak-versus-RMS term.
And a loopback measurement of a QA40x reads its own generator about
√2 (3 dB) louder than the level asked for, which is not a fault
in either direction but the balanced output driving a differential input;
see Theory ▸ The QA40x analyzer
backend.
A typical bench has an E1DA Cosmos ADC on the input, whose DIP attenuator switches its full-scale, and a separate JLsounds card in use as well. Bind each once and their calibrations never cross:
1.7V up to 43V, already in place.
Confirm it by selecting it and pressing OK. (For an unrecognised
card you would instead choose New card... and add the rows by
hand.)Because flipping the DIP means nothing more than switching which range is active, and the values follow the card rather than the back end, switching between the two cards - or reopening the Cosmos under a different back end once its name is bound there - never mixes their full-scales up.
The crosshair Calibrate flows anchor the scale against a known reference - the scope and FFT ADC calibration for the input, and the generator DAC calibration for the output. Each writes the measured full-scale into the active range of the card the device resolves to. If the selected device has no profile yet, the first calibration creates one automatically - logical name from the device, a recognized-name entry for it, and one seeded range - so you get a card profile simply by calibrating, without visiting this tab first.
Calibration is always per channel. A Stereo card opens the shared two-row dialog with a Left and a Right field, because no two physical channels are calibrated exactly alike - coupling shares only which range is selected, never the measured values; a Mono card shows a single row. On the scope ADC path only the row for the currently measured channel is live - the other row is disabled and stays empty, so you calibrate one channel at a time; on the FFT ADC path only the row for the channel being analyzed is enabled, since the FFT works one channel at a time; the DAC path drives both rows. Each row writes only its own channel's active range.
The card's active-range full-scale is resolved - by the
bindings entry for the
device if you made one, otherwise by the match rule - and applied
at these moments: when capture starts (input), when the generator
starts (output), and when you close this dialog with OK. From that
point the resolved value drives the FFT's absolute dBV axis, the oscilloscope's
voltage readouts and the generator's output scaling.
Two cases fall back to the single shared full-scale that predates card profiles: a device that resolves to no card at all, and a card whose active range is still uncalibrated - a row holding zero is an empty row, not a measurement, so it contributes no calibration of its own. That shared value is runtime state only: it is no longer written to the settings document (a document from before 1.2 is still read once, and the entries disappear with the first save), because saving it would store the last calibrated card you selected as the machine-wide default and hand it to the next uncalibrated device as though it had been measured there. The persistent home of every full-scale value is the device store - the cards.
Because an uncalibrated selection measures on a nominal placeholder rather than
on your hardware, closing this dialog with OK after changing the backend or
either device warns you once when the committed selection has no calibration
behind it, naming the input, the output or both. A device that reports its own
full-scale (calibrationFromDevice, a QA40x-class instrument) is
exempt - there is nothing for you to calibrate.
A value also takes effect immediately when you close the calibration dialog with the Calibrate button: the new full-scale is written into the device store and applied through the live card binding to every consumer - the oscilloscope's scaling, the FFT's dBV axis and the generator's amplitude ceiling - without a restart.
The hardware does not have to be wired to the machine you are sitting at. The desktop Phonalyser running as a server on the machine that is wired to the converters turns it into a bench, and this application then measures through it: you pick one of the bench's backends in the list above and everything - devices, formats, cards, calibration, the generator, the sweeps - works as though the hardware were plugged in here. For what happens on the wire, see Theory ▸ A bench across the network.
The Servers... button on the backend row opens Phonalyser servers. The list starts empty, and one address fills it. A browser cannot listen for the announcements servers broadcast on the local network - a page has no way to receive them - so nothing arrives by itself the way it does on the desktop. Instead you type the address of one server in the row at the bottom of the window, and it reports every other server it has heard: its peer table is the whole of discovery here. One reachable bench, and the room appears.
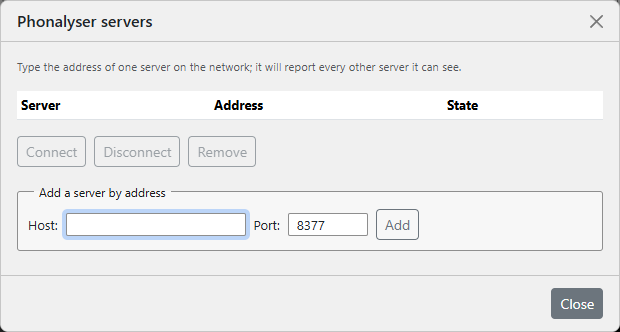
The table has three columns:
| Column | Notes |
|---|---|
| Server | The name the server calls itself - its --name, or the
machine's own name. A server you typed in by address carries the
name it reported when it was added, not the address you typed. |
| Address | Host and port, e.g. bench-pc:8377. |
| State | live - answering right now; offline - a server this installation remembers that is not answering; connected - the one this application is measuring through. Liveness is asked, not announced: opening the window puts the question to every remembered server at once, and it is repeated while the window stays open - so a bench that is switched off turns from live to offline on its own rather than at your next click. That polling lives and dies with this window; nothing probes your network in the background. |
Three buttons sit under the table. Connect and Remove act on the selected row; Disconnect does not - there is only ever one session, and that is the one it ends.
| Button | What it does |
|---|---|
| Connect | Opens the session and reads the server's backends, which then join the backend list. Double-clicking a row - or selecting it and pressing Enter - does exactly the same: it is the same path, refusals included. Greyed for the server that is already connected, so no route re-opens a session over a live one. A server that will not answer says so: No Phonalyser server answered at <address>, with the connection's own words after it. |
| Disconnect | Ends the session - the live one, whichever row happens to be selected and even with no row selected at all; it is available whenever a server is connected and greyed when none is. Not the no-op it looks like: the bench's generator lane and every device this installation holds there are given back on the wire first, so the hardware is released rather than abandoned to the server's own clean-up. Every module measuring through that bench stops, exactly as it would if the connection had died. |
| Remove | Forgets the selected server - and only one that was added by hand. A server learned from another server's peer table is not removable: the next round would put it straight back, so the button would look broken rather than restrictive. Removing the server you are connected to disconnects it first. |
Below the buttons sits Add server manually: - the address field, a Port: field and an Add button - and a Close button:
| Row | Notes |
|---|---|
| Add server manually: (the address field, Port: and the Add button) | How every server gets into this list. Port is pre-filled with 8377, the server's default - one port carries everything, so there is only ever one number to type. Add does not simply believe you: it asks the address for its name and identity, and only then remembers the server, under the name it reported. An address that answers but is not a Phonalyser server is refused as such, and so is an empty address or a port outside 1-65535. It then reads that server's peer table and remembers every server it names, so one address usually brings the whole room in at once. A successful add clears the address field, ready for the next one. |
https:// page can only reach a bench on
this machine. A bench session is a plain ws:// WebSocket,
and a browser refuses to open one from a page it loaded over
https:// - that is the mixed-content rule, and it is enforced
before anything is dialled, so no timeout tells you what happened. The app
says so instead of leaving you to guess. Loopback is exempt, so
localhost, 127.0.0.1 and ::1 still
connect from an https page; any bench on the LAN does not. The way around
it is not a setting - it is to load the app from the bench itself,
which serves its own copy over http://; see
Phonalyser in a browser ▸ The page
a bench serves.A connected server's backends join the Backend list beside the local
ones, written <server> -> <backend> - e.g.
bench-pc -> QA40x. Only backends the bench can really operate
are offered: one that is in the server's build but cannot run on that
machine is left out rather than shown greyed.
<device> - in use by <client>, naming the
machine holding it. A device this installation holds reads
normally - your own running scope is not news.Calibration belongs to the hardware, so with a bench backend selected the Card section works against the bench's store rather than this machine's:
Both of the documents this dialog writes - the settings and the card profiles - can be opened directly, as text, from the Tools menu, in an editor that knows their shape and explains every key. That has a chapter of its own: Editing the settings as JSON.
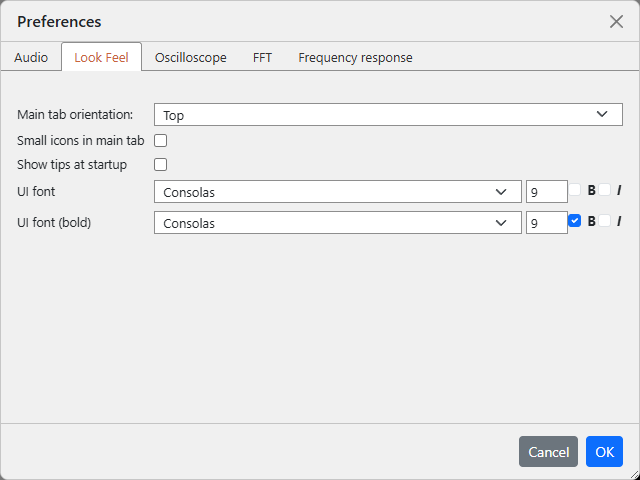
| Setting | Notes |
|---|---|
| Main tab orientation: | Top (a conventional tab strip) or Left
(a vertical sidebar of large icon buttons). Applies live - no
restart. |
| Small icons in main tab | Shrinks the main-tab icons. Applies live. |
| Show tips at startup | Whether the tip of the day appears when the application opens. Clearing the tip window's own Don't show again box does the same thing from the other side. |
| UI font / UI font (bold) | Fonts for axis labels, readouts and measurement tables (bold for emphasised table text). Applied on OK. |
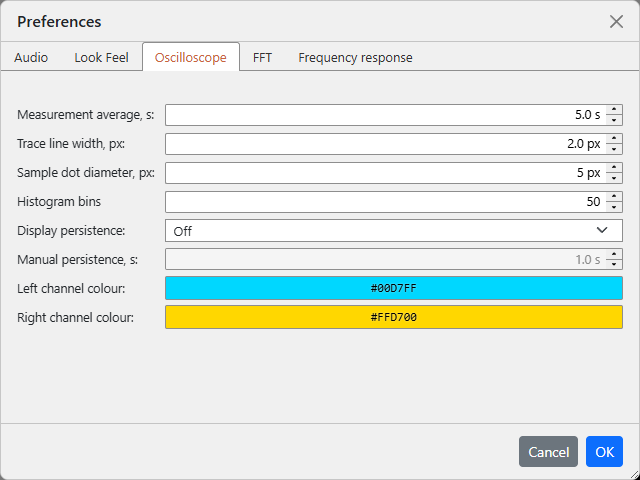
| Setting | Notes |
|---|---|
| Measurement average, s | Window length over which the scope's avg / min / max / σ statistics are accumulated. |
| Trace line width, px | Stroke width of the waveform. |
| Sample dot diameter, px | Size of the per-sample dots drawn when zoomed in. |
| Histogram bins | How many bars the amplitude-histogram panel draws (default 50). Display resolution only: the collection underneath is far finer, so changing this re-draws what has already been collected instead of discarding it. |
| Display persistence | Digital-phosphor afterglow - how long each swept trace lingers
before fading, like an analog scope. Choose Off; a
preset decay time - 0.5 s, 1 s,
2 s, 5 s, 10 s,
15 s or 20 s
(an old trace dims to ~37 % after that time and
~5 % after three times it); ∞ (traces never fade,
accumulating until the view changes); or Manual (use
the field below). Shows trigger jitter and noise as a fading
envelope. Persistence is drawn on the GPU and needs WebGL2 with
the EXT_color_buffer_float extension. There is no
setting for it: where the browser or the graphics driver does not
offer that combination the trace simply does not persist - no error,
no greyed control, just a scope that redraws each sweep clean. |
| Manual persistence, s | Custom decay time, 0.1-60 s in 0.5-s steps, used when persistence is
set to Manual; greyed out otherwise. |
| Left / Right channel colour | Trace colour per channel (defaults cyan #28DCF0 /
yellow #F0DC28). |
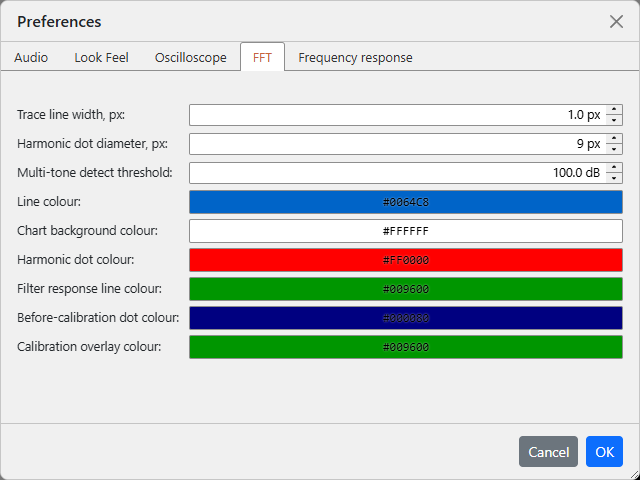
| Setting | Notes |
|---|---|
| Trace line width, px | Stroke width of the spectrum. |
| Harmonic dot diameter, px | Size of the fundamental / harmonic marker dots. |
| Multi-tone detect threshold: | How far below the strongest peak a second peak may sit and still be tracked as its own tone (vs treated as a harmonic) - the single- vs multi-tone routing in Theory ▸ choosing the phase reference. |
| Line colour | Spectrum trace (default blue #0064C8). |
| Chart background colour | Plot background (default white). |
| Harmonic dot colour | The harmonic / fundamental dots - with a calibration loaded this
is the corrected (red) marker. Default red
#FF0000. |
| Before-calibration dot colour | The second marker showing where each peak sat before the loaded calibration was de-embedded - see the red / blue calibration dots. |
| Calibration overlay colour: | Colour of the drawn calibration / correction curve. |
| Filter response line colour | The overlaid mains-comb / filter response (default green
#009600). |
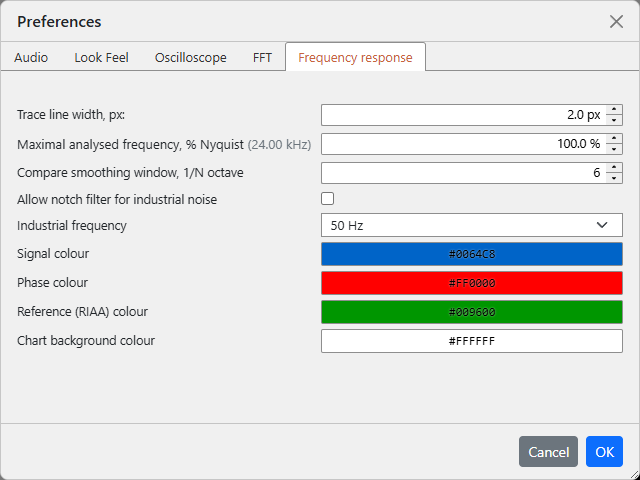
| Setting | Notes |
|---|---|
| Trace line width, px | Thickness of the magnitude, phase, RIAA-reference and compare curves. |
| Maximal analysed frequency, % Nyquist | Caps the view's upper bound at this fraction of Nyquist (96-100 %); below 100 % trims the band where the sweep deconvolution rolls off. |
| Compare smoothing window, 1/N octave | Width of the moving average on the compare-mode (measured − reference) curve. N = 0 disables it; smaller N = wider = more smoothing (N ≈ 3 broad, N ≈ 24 light). |
| Allow notch filter for industrial noise | When on, interpolates across each harmonic of the chosen mains frequency to remove hum spikes from the displayed response without re-measuring. |
| Industrial frequency | The base mains frequency (50 / 60 Hz) whose harmonics are notched when the box above is on. |
| Signal / Phase / Reference (RIAA) / Chart background colour | Per-curve and background colours for the frequency-response view. |